| 3RD QTR 2014 |
 •
•
 •
•
 •
•

|
| 07/01/14 - 1.0 Removed paint sticks and staples from the leading edges. Trimmed leading edge flush with noseribs. Left the wing upside down to fit the next sections of leading edge around the cabane fittings.
| |
| 07/03/14 - 1.8 Cut and shaped two nose scraps that will add support and glue area for the first outboard leading edges where they meet the center section leading edge scarf joints at the seven degree sweep angle.
| |
| 07/26/14 - 1.8 fit the left inboard section of leading edge, I need space between the front spar and the sawhorse, so I shimmed up the spar with blocks, and at the sawhorse I need a gap at, I used a couple of blocks under the drag wire. I then used a paper template lined up with the spar and the cabane fitting to make transfer cut marks for the fitting to the leading edge. I then sawed the notch out of the LE. I then used tape to transfer marks where to cut the inboard end of the LE, then sawed it off. I then located and drilled holes in the nose ribs and LE to keep the LE in the same spot each time while I fit it. I then marked and rough cut the outboard end of the LE.
| |
| 07/27/14 - 1.2 Repeated the same process to get the right inboard LE section roughly fit.
| |
| 08/04/14 - 1.5 Worked on cutting and shaping the scarf joints for the next outboard leading edge sections. Used a file to shape the outside scarf on the wing and then used a dremel tool with a sanding drum to shape the scarf on the interior of the leading edge sections. Had to flip wing over on the sawhorses to work effectively.
| |
| 08/05/14 - 1.0 Did some more work fine tuning and test fitting the left leading edge scarf joint, then glued in the nose scraps on both sides.
| |
| 08/06/14 - 1.7 Used a straight-edge to check progress, I shaped the nose scraps to match the nose ribs. Also did some light sanding on the noseribs with a long sanding board to remove high spots so the leading edges will be smoother when glued on. Also did the interior scarf on the right inboard leading edge section.
| |
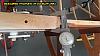
| 08/07/14 - 2.2 Pulled leading edges tight with straps, then drew pencil lines along aft edge of spar between ribs. Pulled the leading edges off then connected the pencil lines with a straight edge before using a hand saw to cut them. Before gluing on the rest of the leading edges and covering up the nuts, I decided to check the tightness of the wires now that they have sat for awhile. I cut the phenolic seperation disks free then check the wire tension. I ended up tightening all the wires a very tiny bit 1/12th of a turn each. Put the discs back in with new BLACK zip ties rated for oudoor use. Don't use the white ones because they fail after a few years.
| |
| 08/13/14 - 2.0 Installed Left Inboard LE Section - Made up some staple sticks by applying clear packing tape to Home Depot paint sticks, then ripping them in half lengthwise on the bandsaw. Got my son Doug to help me glue on the left inboard leading edge. Mixed two dixie cups full of T-88. Doug took one and coated the entire interior surface of the LE with a bondo spreader, while coated the spar and nose ribs. Once I got the top half of the wing done coated, DOug and I flipped the wing over so I could coat the ribs and spar on the other side. Once we got everything coated we put the LE in position and inserted the finish nails to keep it in place while we installed tiedown straps with spanwise wood strips to spread the force of the tiedowns pulling. Once the LE was pulled tight, I stapled the spar edge down with the staple sticks, then flipped wing over and shot the spar strips on that side. I then put two long strips of clear packing tape together and laid it down along the scarf joint. I then put a tiedown strap over the packing taped scarf joint and pulled it tight to get the scarf joint to lay nice and flat while curing. Used a C-clamp to keep the LE down tight against the metal cabane fitting.
| |
| 08/14/14 - 0.6 Removed straps from the leading edge and did a little removal of excess glue.
| |
| 08/17/14 - 1.8 Installed Right Inboard LE Section - Glued, strapped and stapled the right inboard leading edge on using the same process as before.
| |
| 08/18/14 - 0.5 Removed straps from the right inboard leading edge.
| |
| 08/20/14 - 1.2 Removed paint sticks and staples from the top side of the wing, sanded down the excess glue from the scarf joints. Used a file to cut the next scarf into the outer top half of the left inboard LE.
| |
| 08/22/14 - 1.6 Filed the scarf into the top right leading edge, then flipped the wing over to work on the other side. Removed paint sticks and staples from the bottom side and sanded excess glue away. Completed the scarfs on outer ends of the glued LE sections on the wing.
| |
| 08/23/14 - 2.8 Put the left outboard LE section into place and drew pemcil line where to cut the end to match the joint on the inboard end. Cut the end and sanded it to the proper angle, then traced it onto the other LE section and cut it. Drilled holes for finish nail alignment pins. Once both outboard LE sections had their inboard cuts done it was time to cut the outer ends to match up with the wingtips. First I did some sanding on the wingtip edges to get them fitting better on the wings then I taped them in position. I then strapped the LE sections in place and used a little sheetmetal tool to mark the edges of the wingtips on the plywood LE sections. I then cut the outer ends and sanded them to fit with the wingtips.
| |
| 08/26/14 - 1.2 Using the dremel tool with sanding drum, I shaped the interior scarf into the right outboard leading edge and test fit it until it made a flush joint when pulled tight into position.
| |
| 08/28/14 - 1.0 Shaped the interior scarf into the left outboard leading edge and test fit it until it made a flush joint when pulled tight into position.
| |
| 09/01/14 - 0.8 Fitted the right outboard LE and pulled it tight with straps then marked where to cut it to get it flush with the aft edge of the spar on top and bottom. Connected the pencil marks with a straight-edge then cut along the pencil line with a hand saw.
| |
| 09/03/14 - 0.8 Trimmed the left outboard LE section to be flush with the aft edge of the spar on top and bottom.
| |
| 09/05/14 - 1.6 Used the Kimball HP Wing drawing to figure out where to cut the 1.5" diameter holes for the flying wires to pass through the leading edge. Used calipers to measure the thickness of each doubler section and then make a line on the leading edge where the forward edge was located under it. Used a straight-edge to draw a line representing the nose rib, then drew two lines offset 3/4". Where those lines intersect is where I drilled the pilot hole with a step drill. After that I used a 1.5" hole saw to very carefully cut the holes without tearing the thin plywood. When I was done I made a batch of staple sticks to used when gluing the outer LE sections on.
| |
| 09/06/14 - 1.5 Glued the right outboard LE section on. As I was putting the LE section in place with the glue I realized I forgot to drill the 1/4" hole to match the one in the doubler for the interplane strut, so I drew a sharpie mark on the doubler to mark where to drill it out later.
| |
| 09/07/14 - 1.1 Pulled the straps off the LE and the paint sticks at the doubler so I could locate and redrill the I-strut hole. I took a measurement off the left wing and then marked and drilled a small pilot hole to make sure I had properly located it. I then drilled it back out to 1/4". Did some sanding on the scarf joint to remove excess glue.
| |
| 09/08/14 - 2.4 Glued the left outboard LE on and got it stapled and strapped in tight. Then I glued in the wingtip nose scraps. Before doing so, I put clear packing tape on the interior edges of the wingtips to keep them from getting glued in permanently. Later that afternoon after the glued was mostly cured, I removed the straps and paint sticks from the bottom of the wing.
| |
| 09/11/14 - 1.0 Glued and stapled in some small shims on the wingtip nose scraps that I can then sand down to get the wingtips fitting perfectly to match the outer rib and leading edges.
| |
| 09/12/14 - 1.4 Removed the staples and sanded the shims down to flush with the leading edges. Then carefully sanded them down further to achieve a good smooth joint when the wingtips are in position. The gaps between the shims will be filled with glue when the wingtips are installed.
| |
| 09/16/14 to 09/25/14 During my recent trips I've been studying for the FAA Inspection Authorization exam. Decided to go to Baker's School of Aeronautics to brush up and take the test. So I covered up the wing, and flew to Nashville for five days.
| |
| 09/30/14 - 1.1 Fit and glued the -59 sections of sheeting on the top side of the wing just inboard of the ailerons.
| |
| Quarter Total 36.6 hrs / TTD 1532.5 hrs | |
| 3RD QTR 2014 |
•
•
•
|